Reliable automated systems for populating PCBs are a common sight on most of today’s assembly lines. To what extent should manual inspection processes still be implemented into the production of PCBs in today’s demanding electronics industry?
The development of automated inspection routines has been fuelled in part by the changes in electronics manufacturing processes.
The departure from through-hole components to surface-mount components meant that traditional in-circuit tests no longer had the electrical connectivity to provide high levels of fault coverage. It has been accelerated further by the use of increasingly small geometry devices, forcing the requirement for a high connection count automated solution.
PCB inspection systems come in many forms, positioned at post paste, post place, post solder and finished goods stages:
- Automated optical inspection [AOI]
- Automated X-ray inspection [AXI]
- Automated Infrared inspection;
- Manual video and manual optical inspection
Even with the advancements in automated inspection technology, a crucial aspect remains – programming and training these systems to meet specific fault coverage requirements relies on human intervention.
When generating automated inspection programs, an initial high-quality manual inspection process is key. This is particularly important when a variety of boards are being assembled and tested.
Purpose of manual inspection of PCBs in today’s industry
R&D engineers often rely on optical inspection, especially when the prototypes of boards are inspected for accuracy and design for fit. During prototyping, automated routines have not been programmed. With no defect history, quality procedures rely on the experience of the engineers and the tools’ accuracy to manually inspect the boards.
Often, alongside automated inspection systems, there will be spot checks on production solder quality. Strict quality procedures are in place to ensure consistent inspection of the boards by automated systems.
Maintaining a balance between cost and quality considerations, companies often explore new or alternative suppliers for cost-effective components. In such cases, it is necessary to check the new components for consistency and quality. This is typically accomplished through inspection, with manual inspection being the preferred method.
Optical inspection is a suitable solution for designing and manufacturing custom boards when a significant investment in automated inspection may not be required.
Various manual inspection systems are available, ranging from basic bench magnifiers to advanced high-resolution video cameras. However, stereo microscopes stand out as the cornerstone of manual inspection solutions. While video systems have seen a significant increase in resolution over the past decade, it’s crucial to note that they can only provide 2D images to the operator, unlike the immersive 3D experience offered by stereo microscopy.
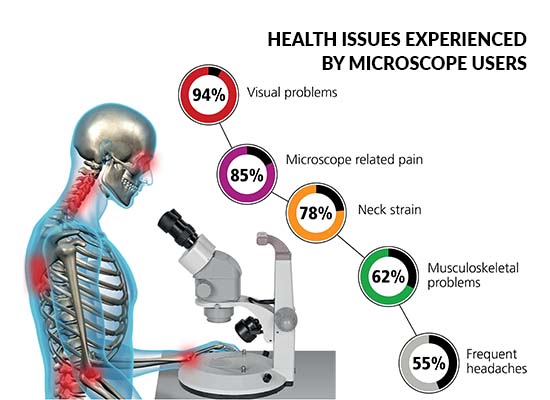
Yet, operators are forced to adopt uncomfortable positions due to the conventional microscope design, enduring prolonged periods of discomfort. This not only leads to operator fatigue but also heightens the likelihood of errors.

Ergonomics and manual optical inspection
In situations requiring manual optical inspection, prioritizing top-notch ergonomics becomes crucial.
The combination of human operator and microscope offers a powerful and versatile inspection solution, suitable for electronics manufacturing operations of any scale. Yet, the everyday challenge of operator fatigue poses a real obstacle, potentially impacting the accuracy of operations.
This not only guarantees maximum operator comfort, minimising fatigue from awkward postures but also enhances accuracy and productivity.
Eyepiece-less microscope technology
Vision Engineering’s patented optical technology is designed to overcome the fundamental problem of a conventional microscope – the small image that exits from the microscope eyepieces.
With ‘eyepiece’ microscopes, the size of the image exiting the eyepieces (the exit pupil) is around 3mm in diameter. This means that the operator must precisely align their eyes with the eyepieces, otherwise, just a small movement of the head will result in a loss of image. The result is an operator fixed rigidly in an uncomfortable position.
‘Eyepiece-less’ technology enlarges the image exiting the microscope eyepieces.
Vision Engineering’s unique range of stereo inspection microscopes utilises patented technology to optimise ergonomics: Dynascope™ viewing head.
The patented Dynascope™ optical technology, featured in Lynx EVO systems, employs a 148mm diameter multi-lenticular disc with over 3.5 million individual lenses, each measuring 70 microns. Spinning at 3,400rpm, the disc merges these lenses to create a smooth, expanded stereo image with a broad depth of focus and field of view.
This multi-lenticular disc expands the system’s intrinsic pupil, projecting a high-resolution image onto a large viewing area for optimal comfort.
Reducing eyestrain and fatigue
Operators benefit from reduced eyestrain and fatigue when using a system where the magnified image is at the same distance as the actual object, eliminating the need for constant refocusing.
In addition, using a viewer instead of eyepieces allows greater head freedom, an upright posture and accommodates the use of glasses.
Unlike traditional microscopes, operators can keep their reading glasses on, avoiding the need for repeated refocusing which quickly leads to eye fatigue. Operators with astigmatism fare worse: removing spectacles immediately spoils their vision.
This ergonomic advantage leads to increased production rates and decreased scrap by enabling operators to work for longer periods without experiencing visual fatigue.
Even better ergonomic viewing of PCBs
Employing LED illumination and an oblique and direct viewer, Lynx EVO provides a full 360° view around the PCB for a 34° angled inspection of solder joints and pad alignment that can often be hard to reach by usual stereo inspection methods.
Lynx EVO is widely used in the electronics industry, providing unrivalled ergonomic performance and optimum clarity with superb optics.
In addition, Lynx EVO benefits from LED illumination, projecting brighter, whiter, and longer-life illumination on the PCB. Dimmable LEDs provide precise illumination intensity suitable for inspecting a variety of components, including device leads, PCB via holes, connectors, solder joints, solder bumps on SMT, TAB, and ball-grid array devices, as well as precision wafer bumping characteristics.
Supported by the powerful oblique and direct viewer, the stereo depth offered by Lynx EVO ensures surface features can be thoroughly and accurately inspected in three dimensions without moving the component.

This technology operates in conjunction with automated processes to enhance the quality of PCBs. Manual inspection is crucial in situations where automated systems may not be cost-effective or when working alongside them. Given the dynamic nature of technology and the continuous evolution of components, optical inspection offers engineers a magnified view. Allowing them to leverage their expertise and knowledge to address individual case-by-case scenarios and imperfections.
Vision Engineering’s latest evolution of patented ‘eyepiece-less’ technology not only removes the need for the restrictive eyepieces of a conventional microscope but provides the user with the ability to see high detail, in complete comfort.
Vision’s continuing research and development program is set to produce more award-winning, innovative products.


